Data entities in Microsoft Dynamics 365 F&O. Practical configuration guide
How to work with data entities in D365 F&O. Run an import or export in Data management, find standard entities, add a field to one and build a custom entity.

Part 1 of this series explained what data entities are and why they matter. This post is the hands-on part. It shows how to run an import or export in the Data management workspace of Dynamics 365 Finance and Operations (F&O), how to find the standard entities, how to add a field to a standard entity and how to build a custom entity in Visual Studio. It ends with best practices for performance, maintainability and security.
Setting up data entities for import and export
An import or export starts with a data project in Data management and most of the setup is point and click. The steps below follow the export project from the screenshots. An import project is built the same way, except that you upload a source file when you add the entity. Steps 3 to 5 say where an import behaves differently.
-
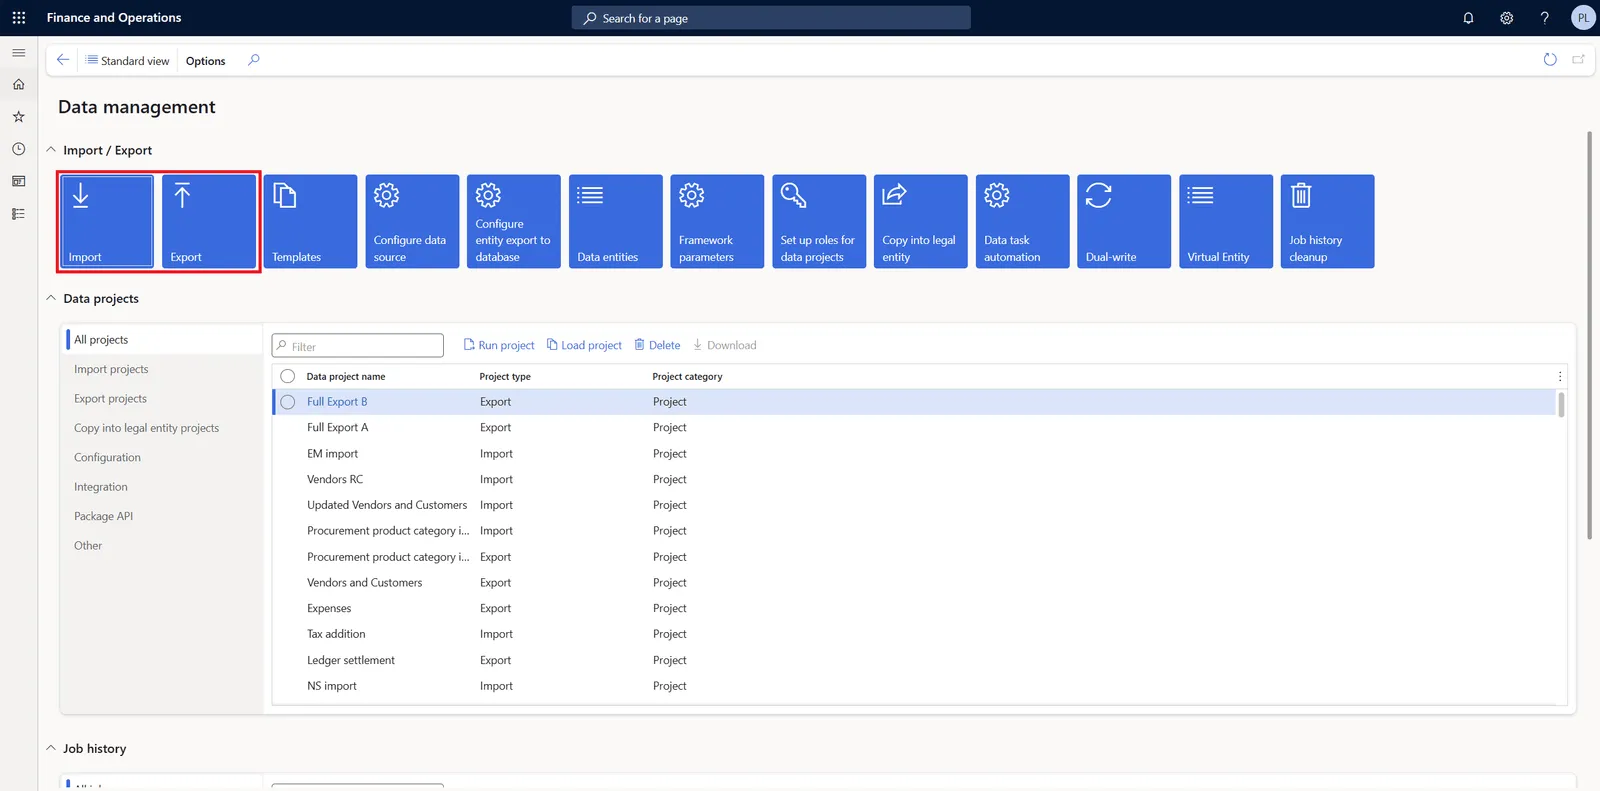
Open the Data management workspace. In F&O, go to Workspaces > Data management and select the Import or the Export tile to create a data project. Think of a data project as a container for one or more entities that you want to import or export. Enter a name in Group name, for example Customer data export.
-
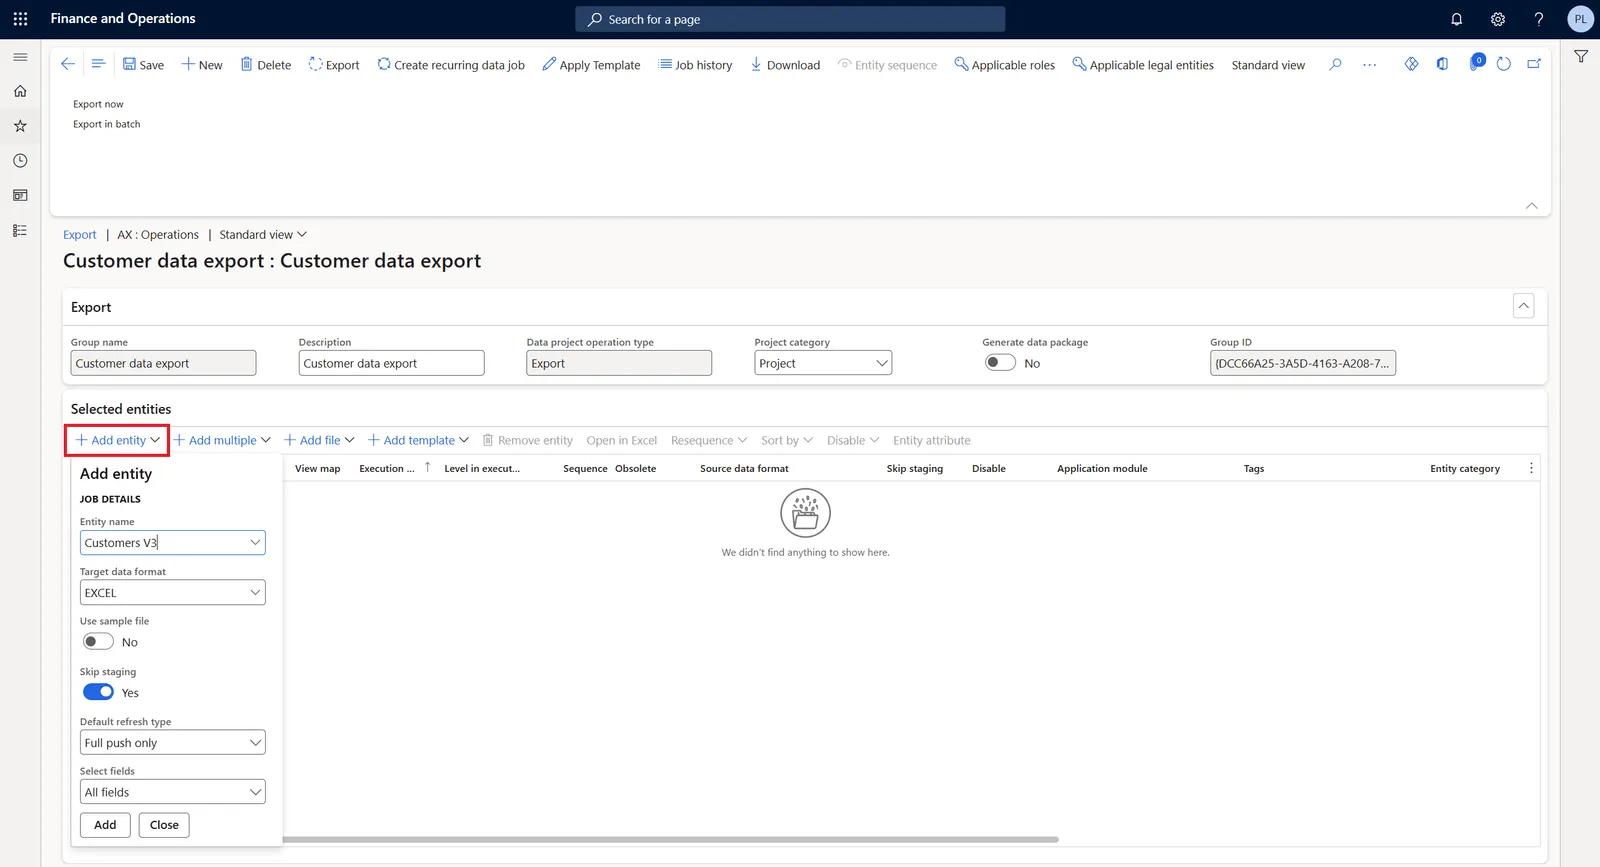
Add entities to the project. Select Add entity and choose the data entity you need, for example Customers V3 for customer records. Then pick the data format, such as Excel, CSV or XML. Microsoft documents a limit of 255 columns for import and export in Excel format, so for an entity with more fields CSV is the safer choice.
-
Field mapping. F&O maps the fields for you when you add the entity. Select the icon in the View map column of the entity to review or change the mapping. In an import project the columns of your source file are matched to the fields of the entity by name. If the names differ or you want to set default values, you configure that here.
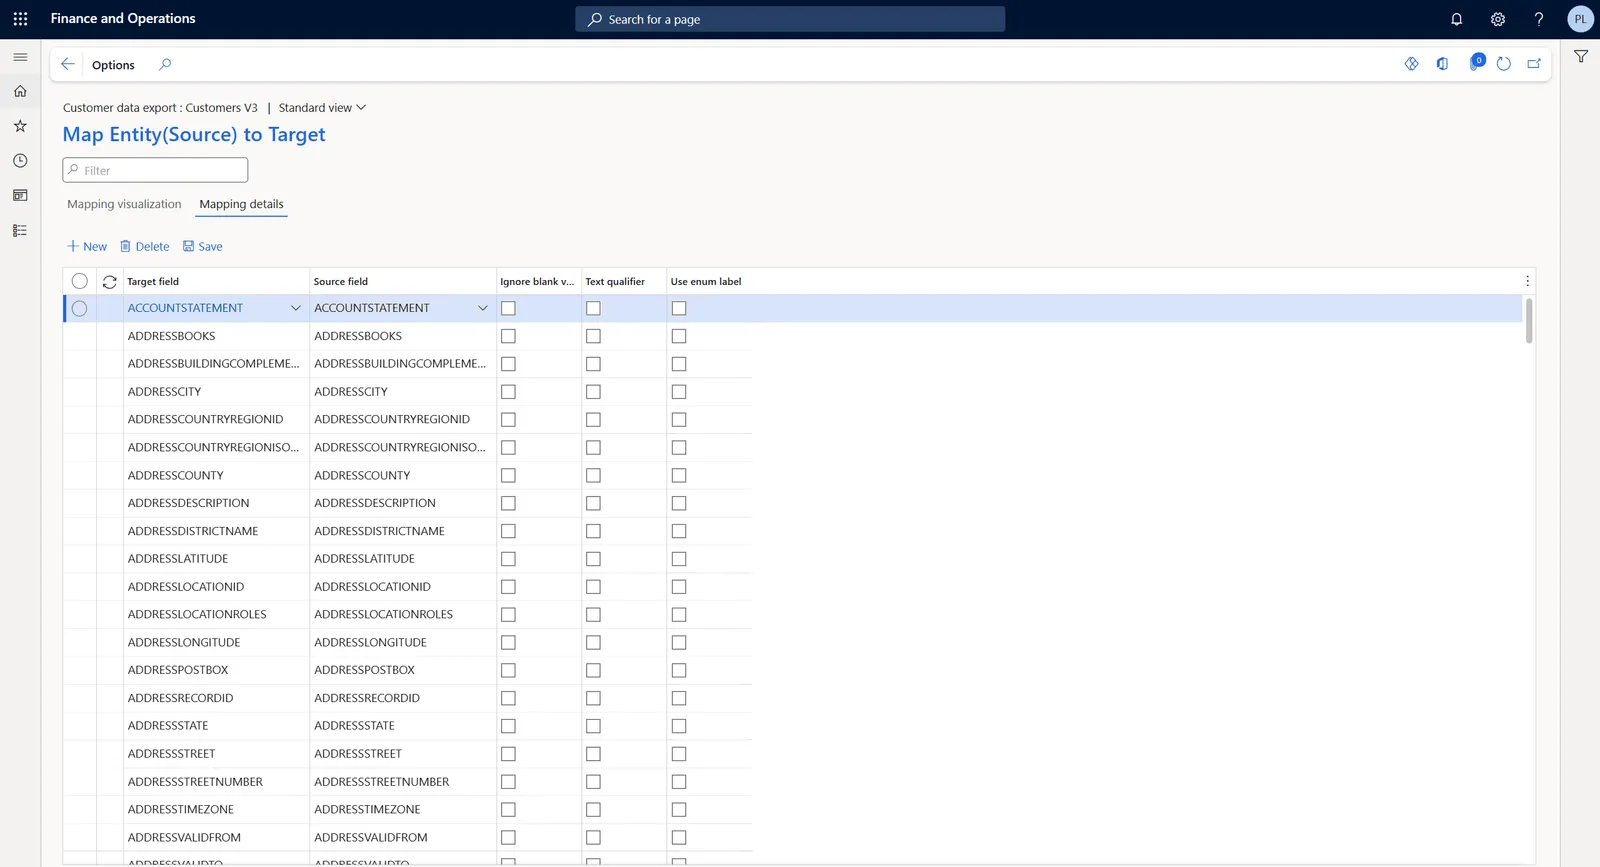
-
Staging. An import goes through the staging table of the entity, where you can fix bad records before they reach the target tables. An export can skip staging and in the Add entity dialog from step 2 Skip staging is set to Yes by default. Microsoft recommends leaving it that way, because an export through staging writes the data twice. Only some entities need staging for an export, for example one with a
postLoadmethod or virtual fields. If an export stops with a message that tells you not to skip staging, clear the option for that entity. The screenshot below shows the same option in the grid of the project. For Customers V3 the box is empty, which means this export went through staging.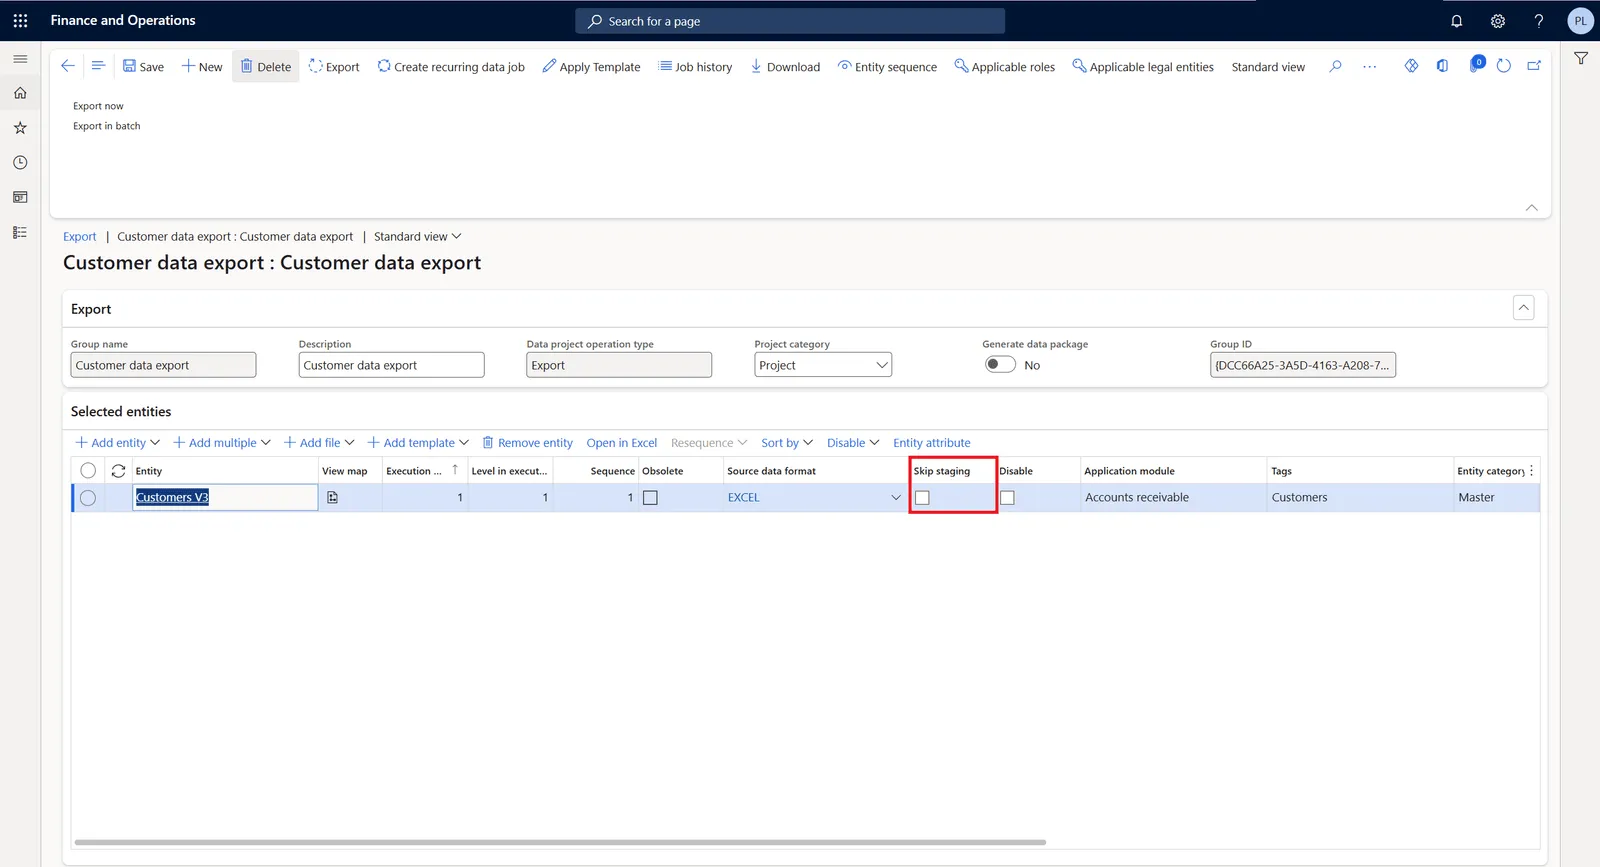
-
Run and monitor. Run the project with Export now or Export in batch. An import project has the same two choices under Import. The Execution summary lists each entity with its status under Entity processing status. Select Download file there to get the exported file. When records fail validation in an import, select View staging data to see them with their error messages. You do not have to start over. Fix the failed records in staging with Edit, check them with Validate all and send them on with Copy data to target, or correct the source file and import it again.
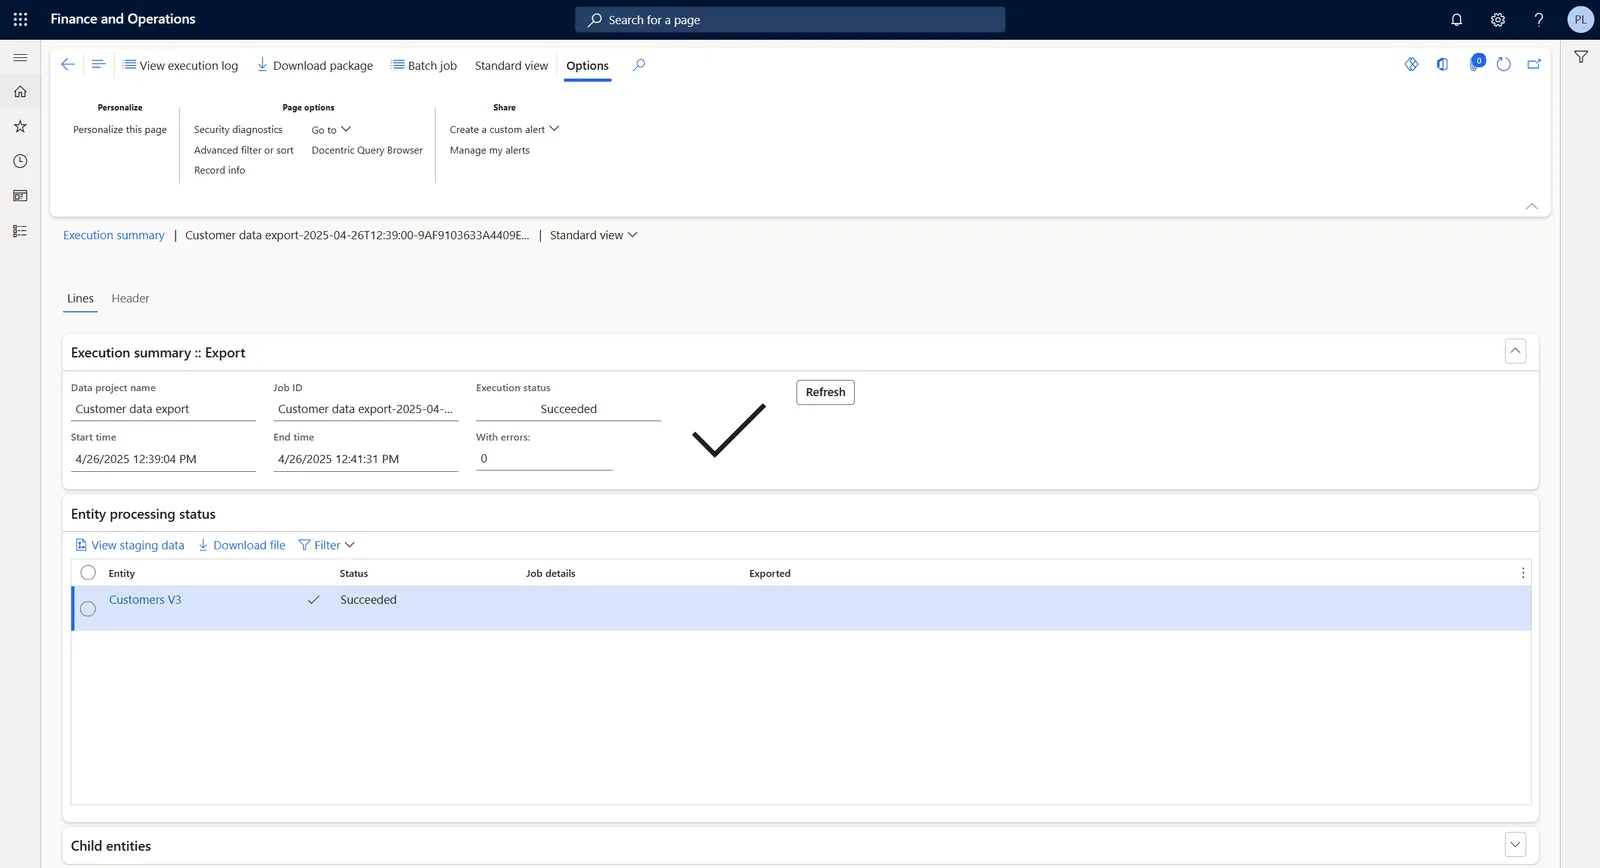
-
Data packages (optional). If a project has several entities, you can export them together as a data package, a zip file with the data files, a manifest and a package header. Select Download package in the Execution summary to get it. In an import project you select Package as the source data format and upload the zip file. All its entities are then imported in one run. It is a good way to move configuration between environments.
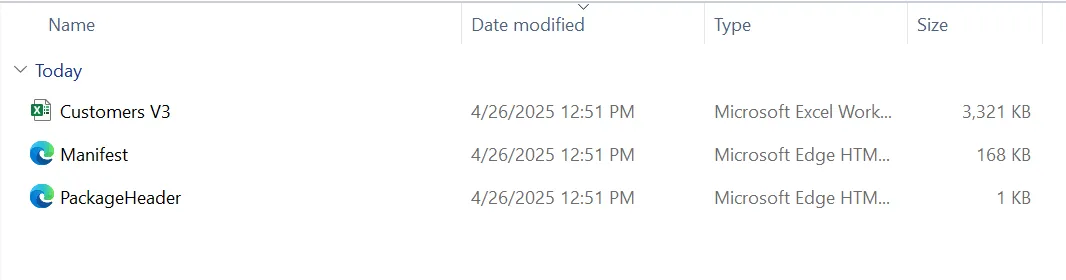
Always verify the result after an import. Spot-check the records in the application or with the Excel add-in. For troubleshooting, start with the job history and the execution log. They tell you, for example, that a required field was missing or that a value was invalid.
For large imports, split the data into several files instead of one very large file. Smaller files make errors easier to isolate. Test the file size with real data, because the best size differs from entity to entity.
Finding and using standard data entities
F&O comes with several thousand standard data entities. Here is how to find and use them:
-
Data entities list. In the Data management workspace the Data entities tile opens a searchable list of all entities in your environment. Filter it on
Customer, for example, to see the entities for customers. The technical names take some getting used to. Customers V3 isCustCustomerV3Entityin the Target entity column.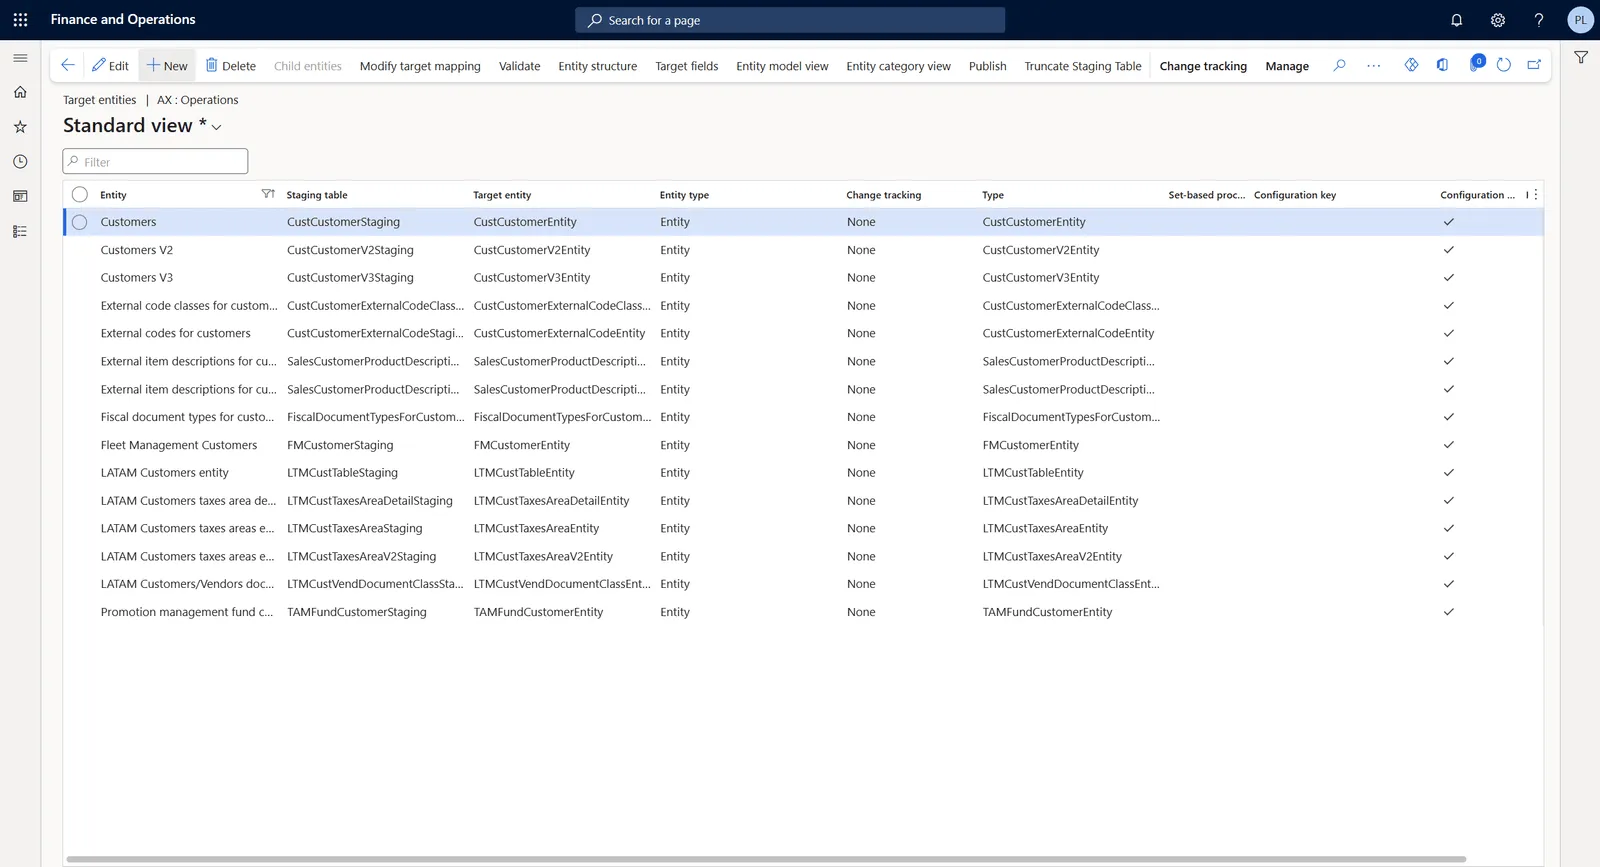
-
Entities in Excel. The Excel add-in opens an entity in Excel, where you can refresh the data or publish changes. In F&O the user needs only security privileges on a public entity. The screenshot below shows the add-in, opened from Add-ins on the Home tab, with Customers V3 as the data source.
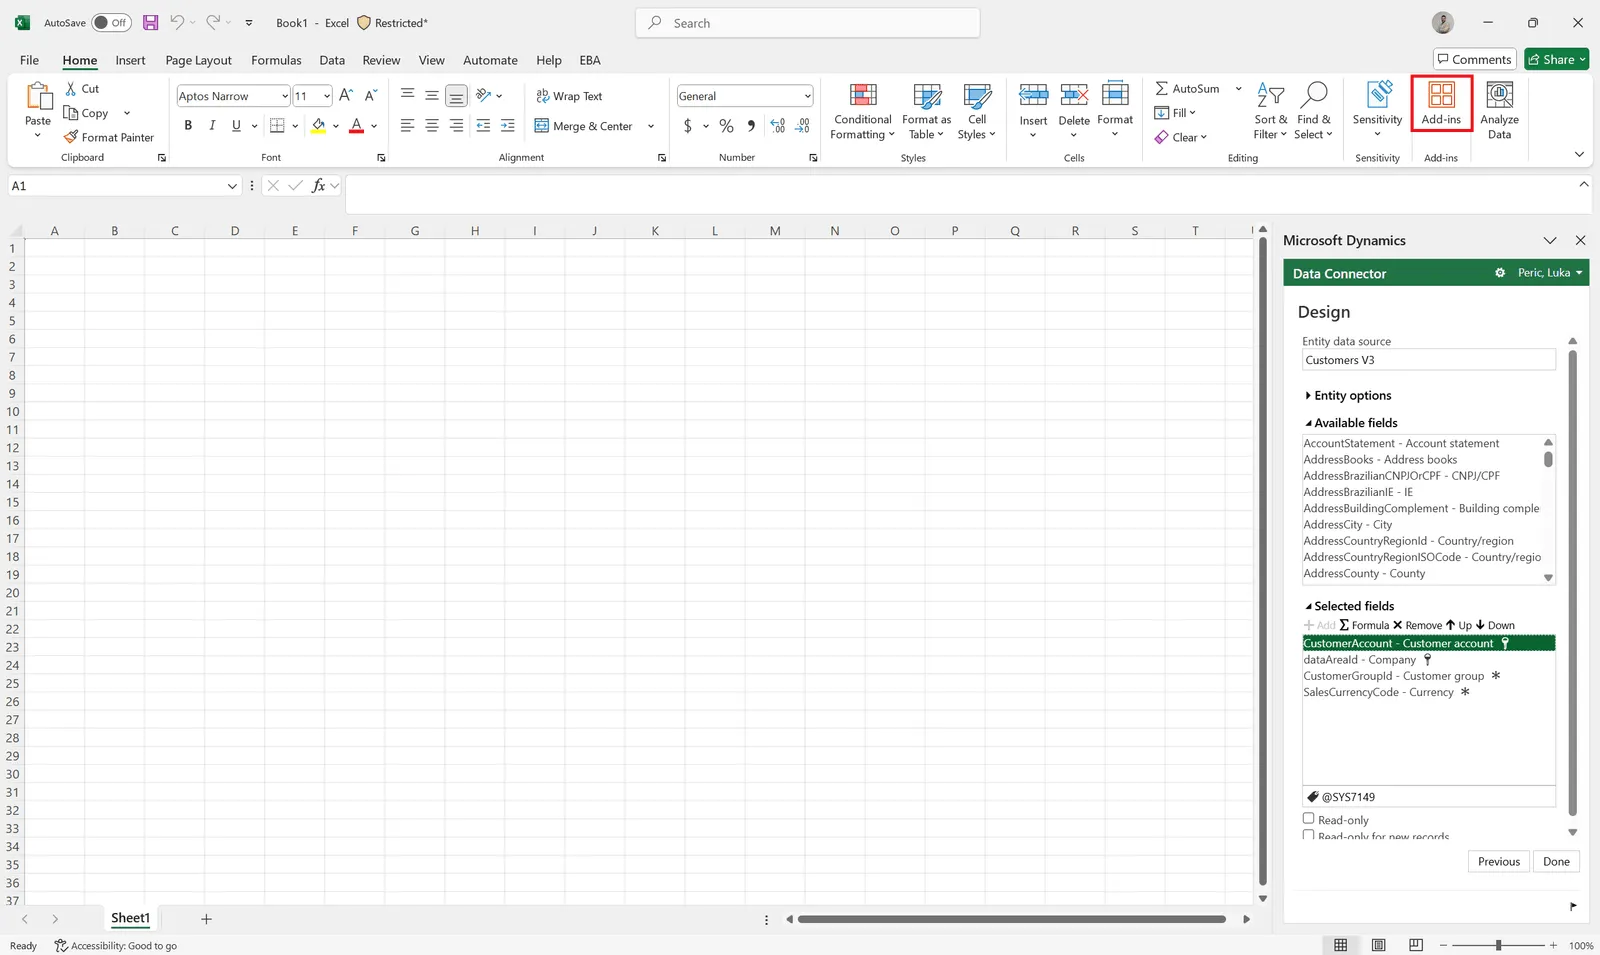
-
Entities in other applications. Other applications read and write the same public entities through OData. An external application has to be registered in Microsoft Entra ID first. An application that calls F&O without a signed-in user must also be added in F&O under System administration > Setup > Microsoft Entra ID applications. Power BI can connect to OData too, but Microsoft’s integration guidance says not to use OData for Power BI reports. For reporting and analytics use Link to Microsoft Fabric or Azure Synapse Link for Dataverse. I describe both in F&O integration patterns.
Make sure you use the right entity for the job. For customer imports Microsoft recommends the Customer definitions entity for most scenarios, because it is faster. Customers V3 has about 80 fields that the smaller customer entities lack and the examples in this post use it.
Extending an existing data entity (adding fields)
Sometimes a standard entity has almost everything you need and only one field is missing. You do not have to build a new entity for that. You extend the standard entity with your own field and stay within supported customization. As an example, take a custom field LoyaltyLevel on the customer table CustTable that groups customers by purchase history and rewards status.
With a unified developer environment the build runs on your own machine. After every build in this post you then deploy the model with Extensions > Dynamics 365 > Deploy > Deploy Models to Online Environment and synchronize the database in the same dialog.
These are the steps to add the field to the Customers V3 entity:
-
Add the custom field to the table. Add
LoyaltyLeveltoCustTablewith a table extension in Visual Studio. Then build your project and synchronize it with the database.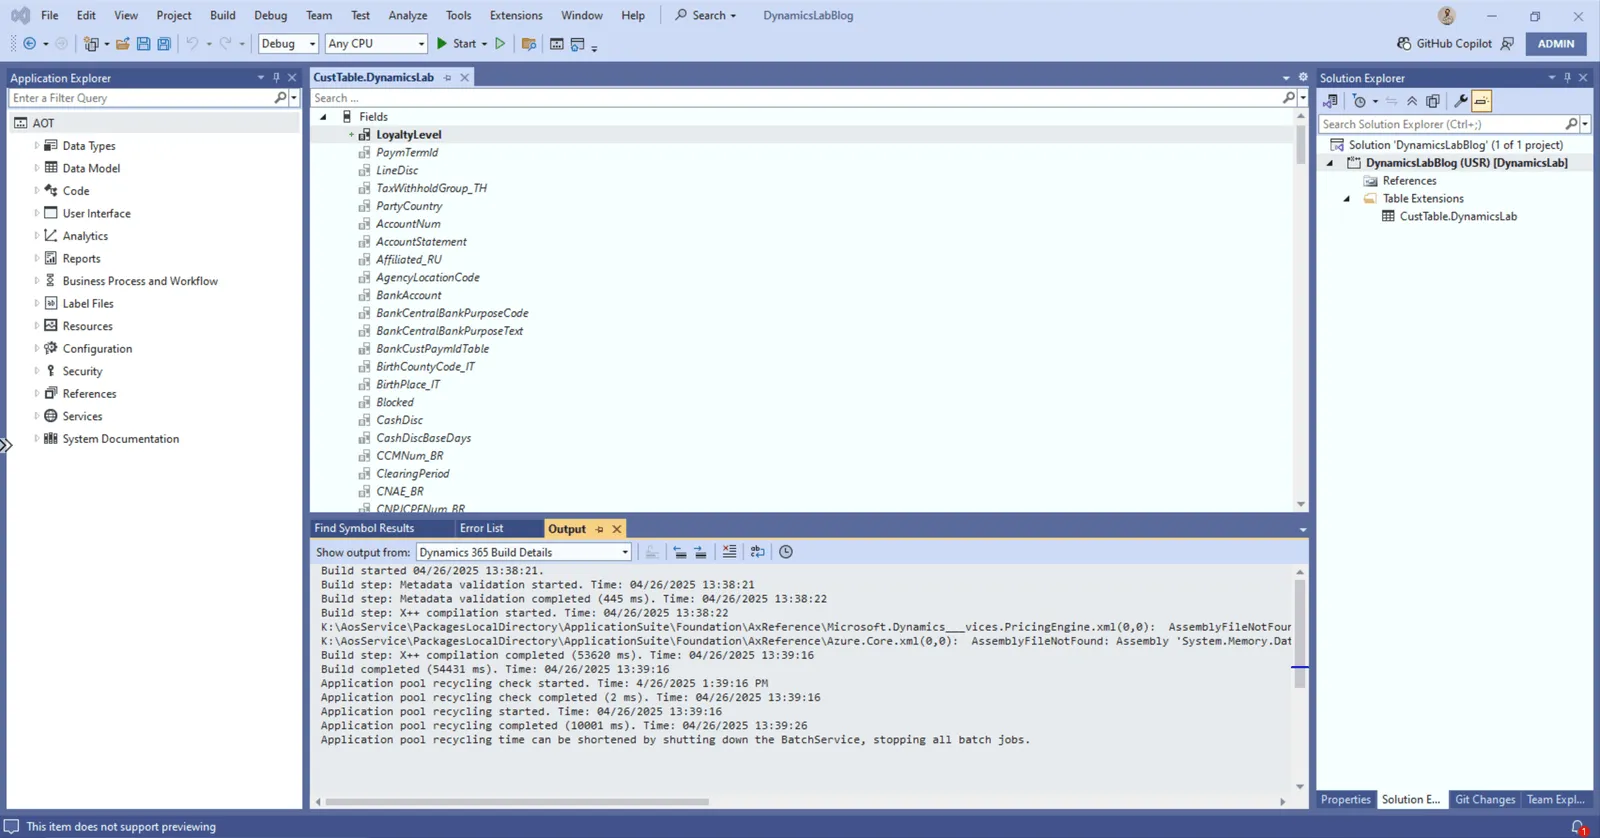
-
Create an entity extension in Visual Studio. In Application Explorer, search for
CustCustomerV3Entity. Right-click the entity and select Create Extension.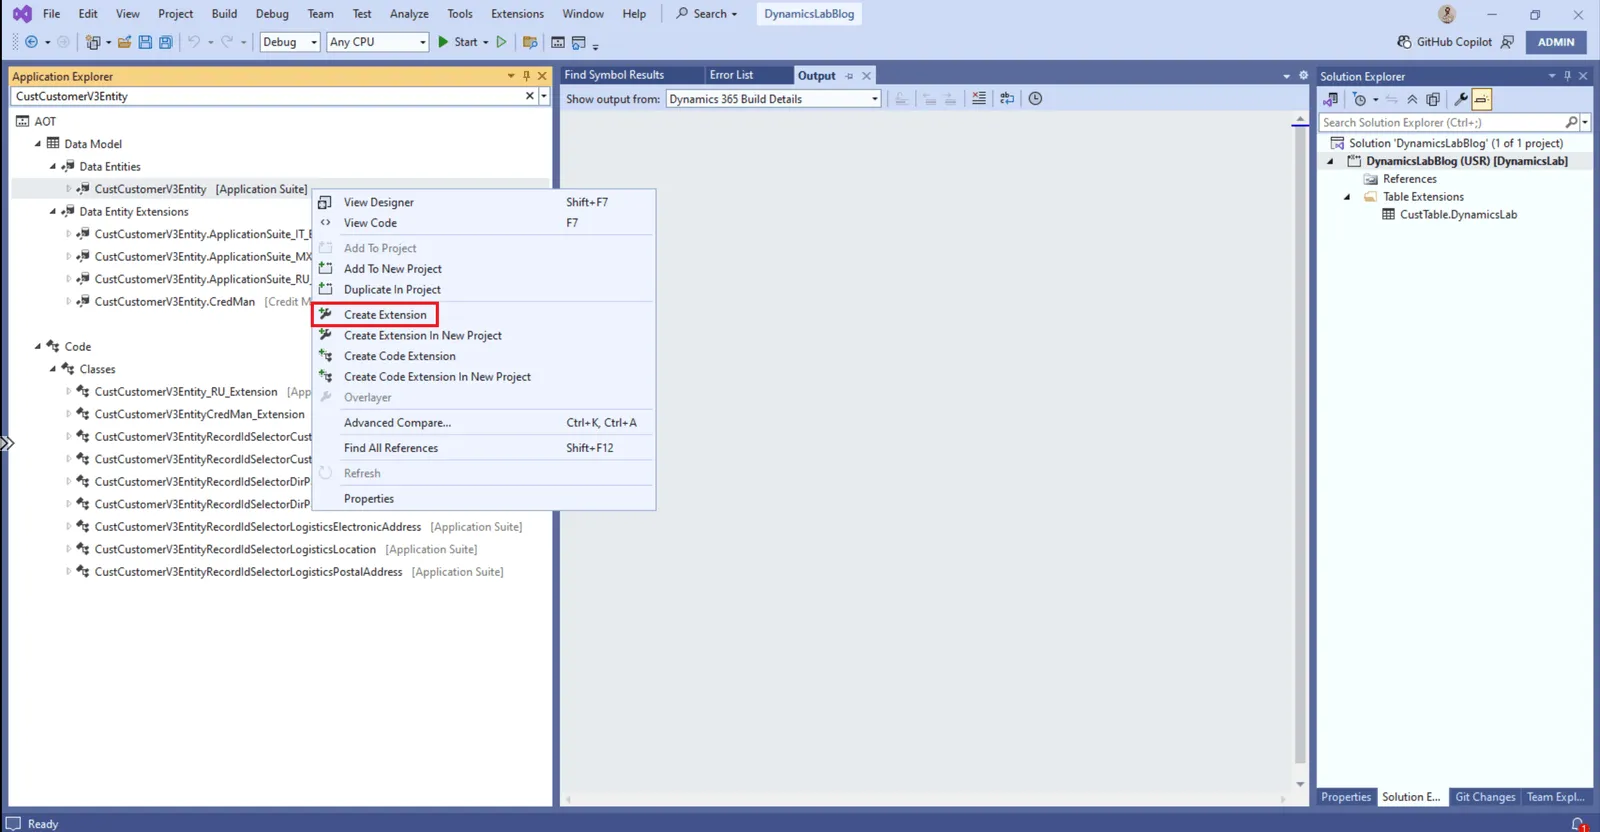
-
Add the new field to the entity. In the designer of the entity extension, find
LoyaltyLevelunder the data sourceCustTableand drag it to the Fields node of the entity.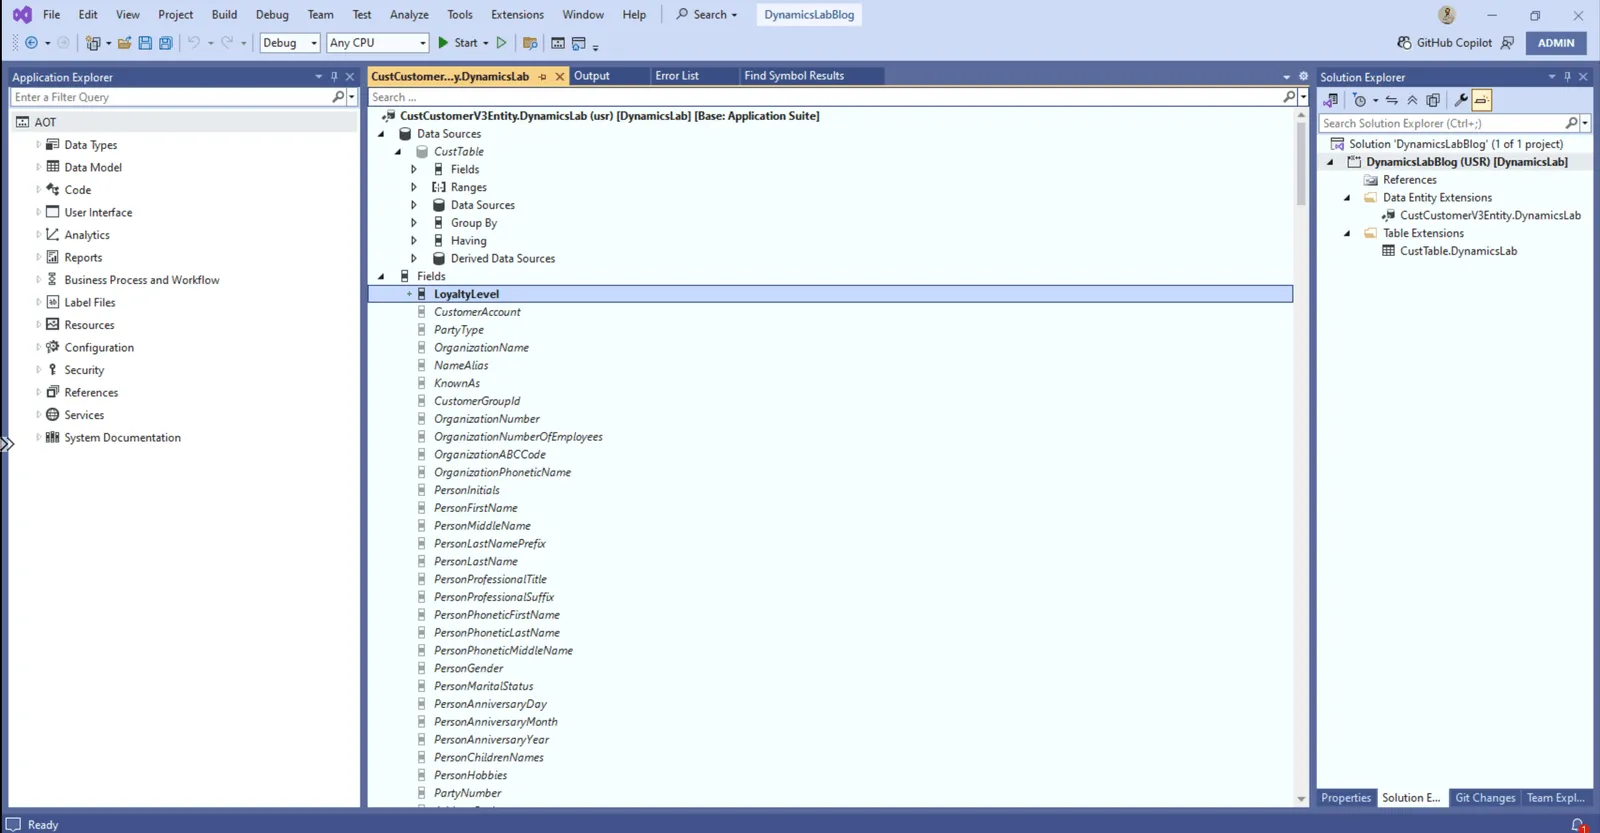
-
Extend the staging table. An entity that is enabled for Data management has a staging table, here
CustCustomerV3Staging. Add the field to it with the same name and the same data type through a table extension. The staging table of an extended entity is not updated for you. Then build the project and synchronize the database again. Check that both finish without errors.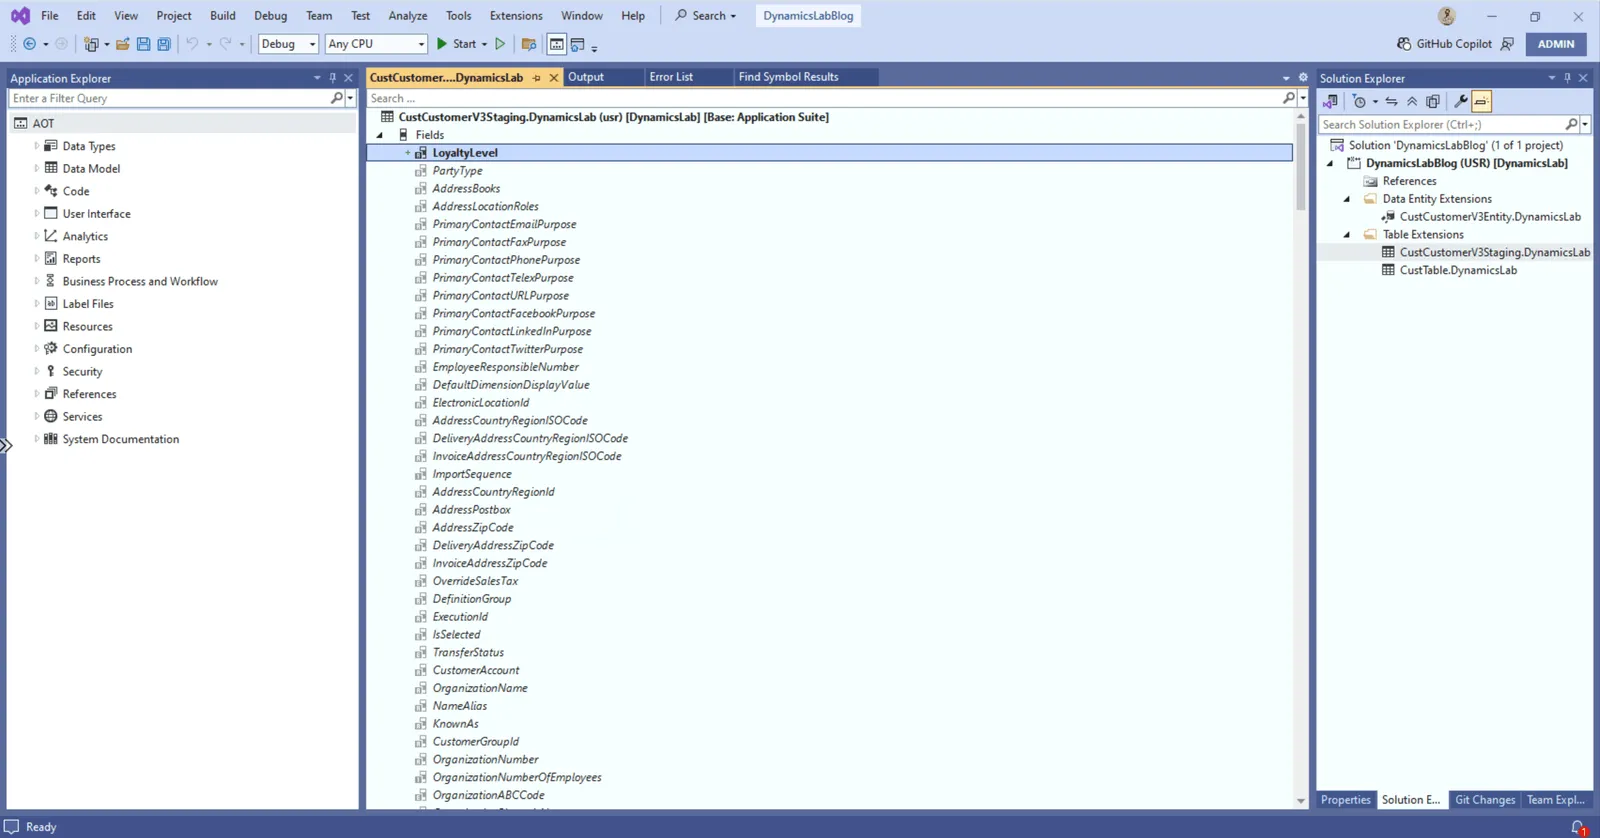
-
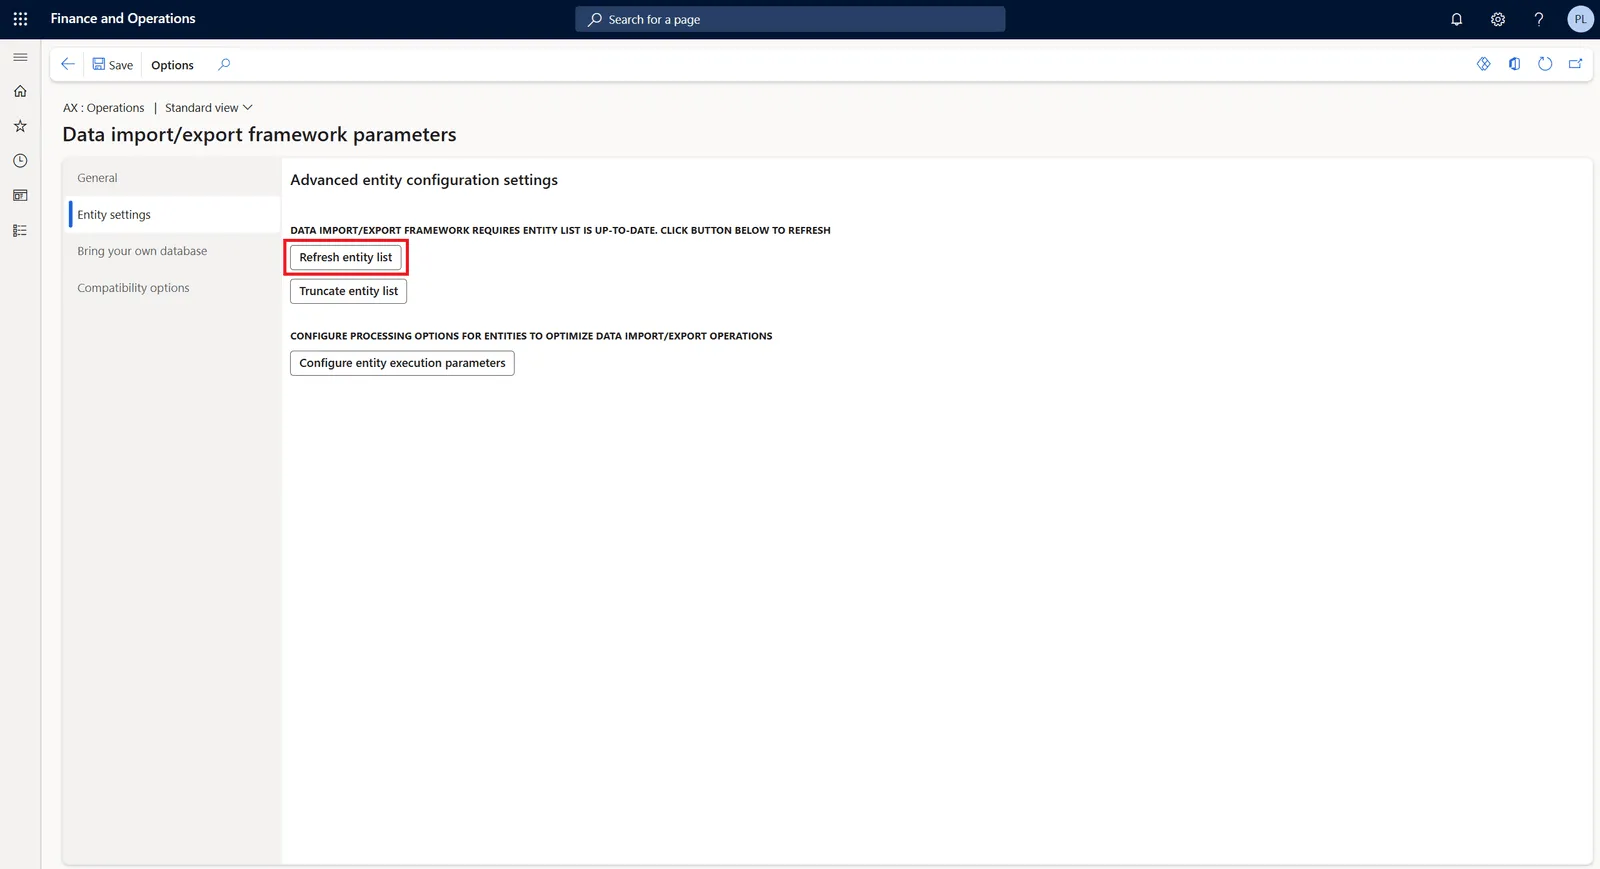
Refresh the entity list. In the Data management workspace, select Framework parameters > Entity settings > Refresh entity list. This updates the entity metadata with your changes.
-
Regenerate the mapping. A data project that already uses the entity keeps its old mapping. In an import project, open the mapping of the entity through the View map column and select Generate source mapping. Answer Yes when F&O asks whether to generate the mapping from scratch. The source file needs a column for the new field, because the mapping is built from the columns of the file. In an export project, add the field on the Mapping details tab with New or remove the entity from the project and add it again.
For the user the new field now behaves like any other field. If you open the entity in Excel or export it, the new field comes along.
Things to keep in mind
- More data sources. You can use the same technique to add a whole new data source to an entity, for example a related table. You add the table as a data source in the entity extension and join it to the existing one, which sometimes takes a little X++ code.
- Business logic. To change the business logic of the entity, for example the way it validates data, wrap its methods with X++ Chain of Command. Wrap
validateWriteto add your own validation. Whether it runs during a Data management import depends on the entity settings described under Extensibility in part 1. Stay away frompostLoad. Microsoft advises against it, because it forces every export of the entity through staging. For a value that has to change before export, Microsoft suggests a computed column. - Testing. Always test the extended entity with a small data file to make sure the new field exports and imports correctly. If something does not work, check that you extended both the entity and its staging table.
Creating a new custom data entity
For a completely new table in F&O, such as an asset registry, no standard entity exists. In that case you create your own data entity. With it you can import, export and integrate the data of your table in the same way as with a standard entity. These are the steps:
-
Use the wizard. In Visual Studio, right-click your project and choose Add > New Item. Under Data Model select Data Entity, name the entity
AssetRegistryEntityand select Add. The Data Entity Wizard opens. It needs a natural key on the table. If it reports that the natural key for the table was not found, the primary index of the table is based onRecId. Make a unique index on a business field, such as the asset ID, the primary index or mark it as an alternate key.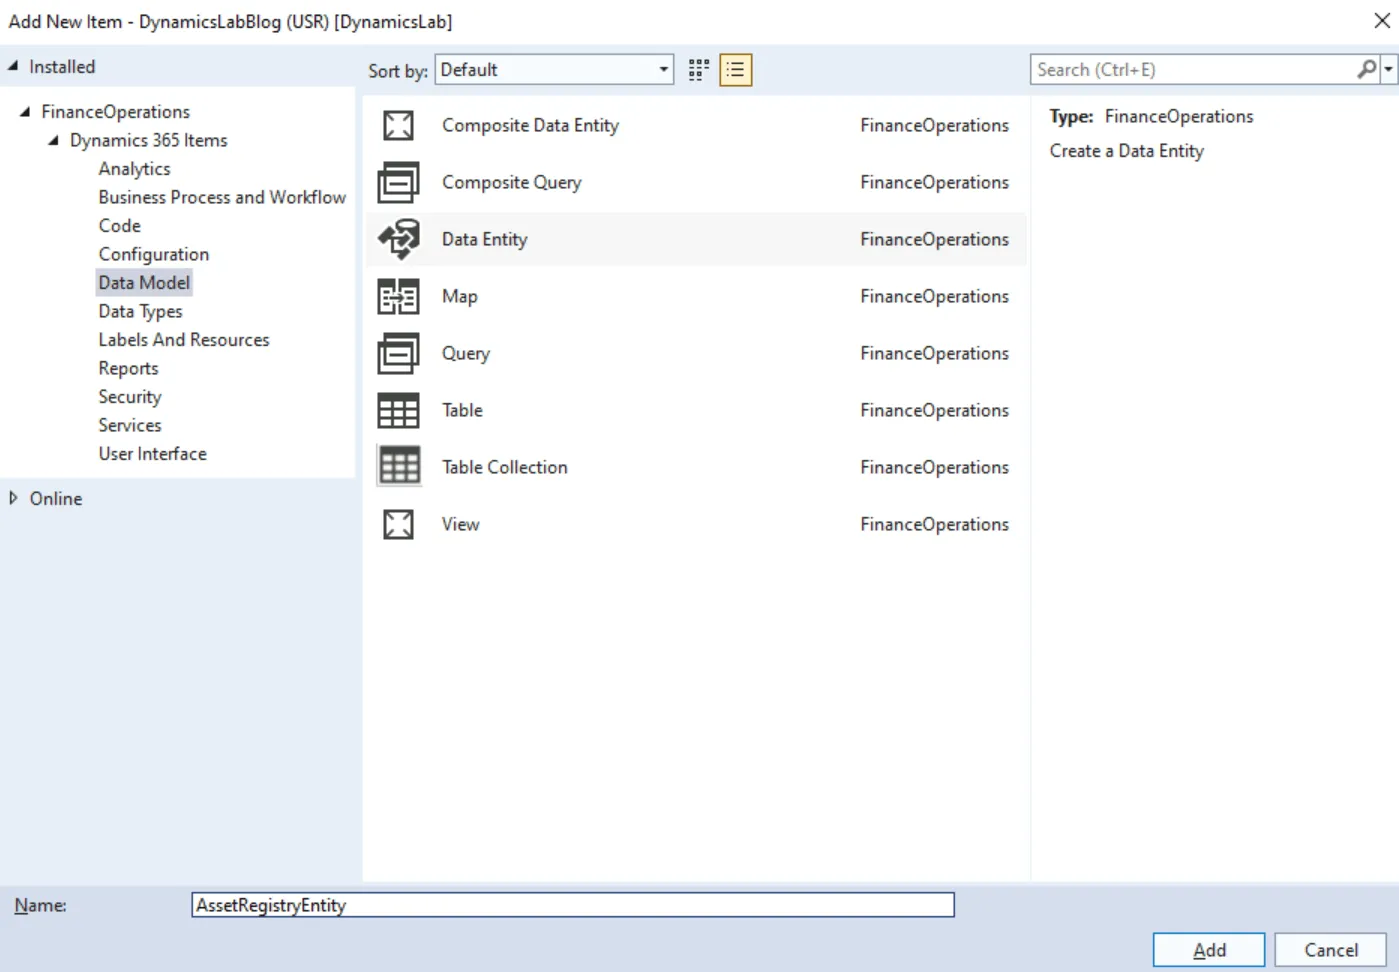
-
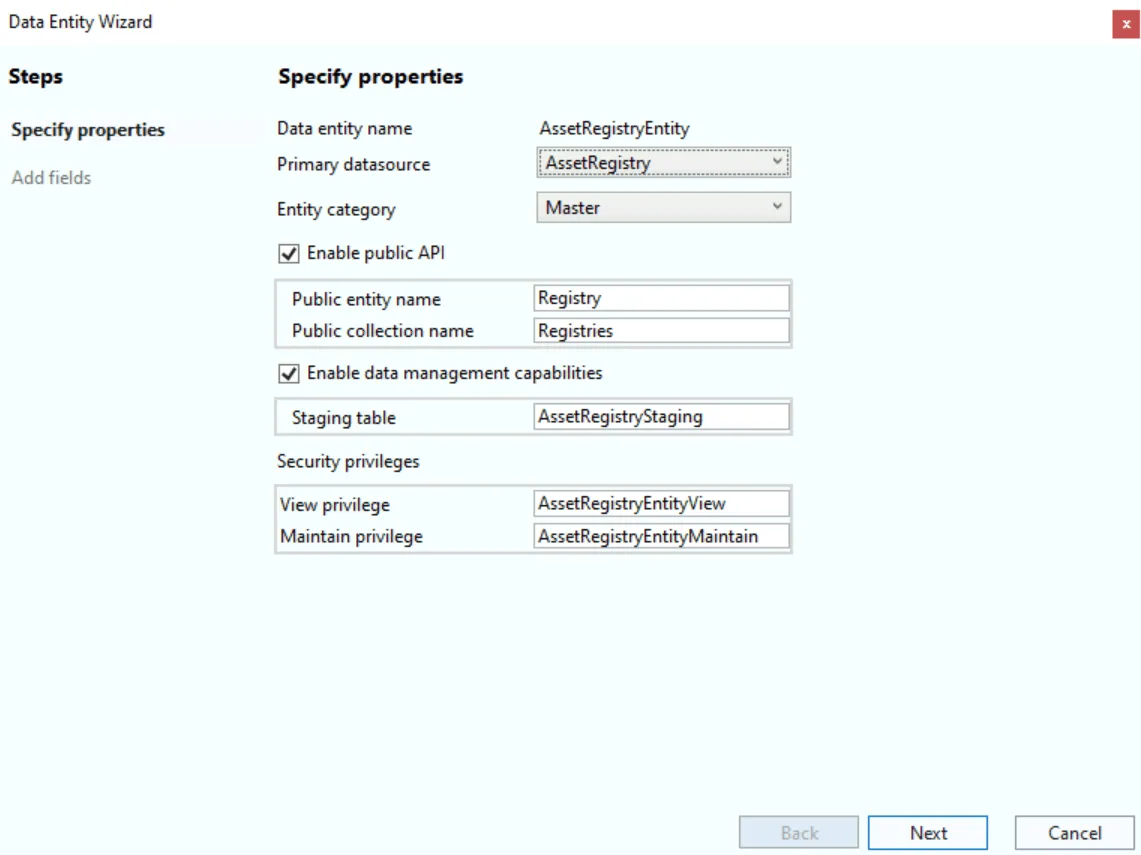
Set the properties. On the first page of the wizard, fill in these properties:
- Primary datasource. Select your main table, here
AssetRegistry. - Entity category. Choose Master, because the asset registry is master data.
- Enable public API. Select this option to expose the entity through OData, which the Excel add-in uses too.
- Public entity name and Public collection name. These are the names of the entity in OData, in singular and in plural. Microsoft’s guideline is the entity name without prefix and without the Entity ending, here
AssetRegistryandAssetRegistries. The screenshot below shows the shorterRegistryandRegistries. - Enable data management capabilities. Select this option to allow import and export in Data management. The wizard then also creates the staging table, here
AssetRegistryStaging. - Security privileges. The wizard creates two privileges,
AssetRegistryEntityViewandAssetRegistryEntityMaintain. They are not part of any duty or role, so until you add them to a duty only a system administrator can use the entity. The Security section says which duties to use.
- Primary datasource. Select your main table, here
-
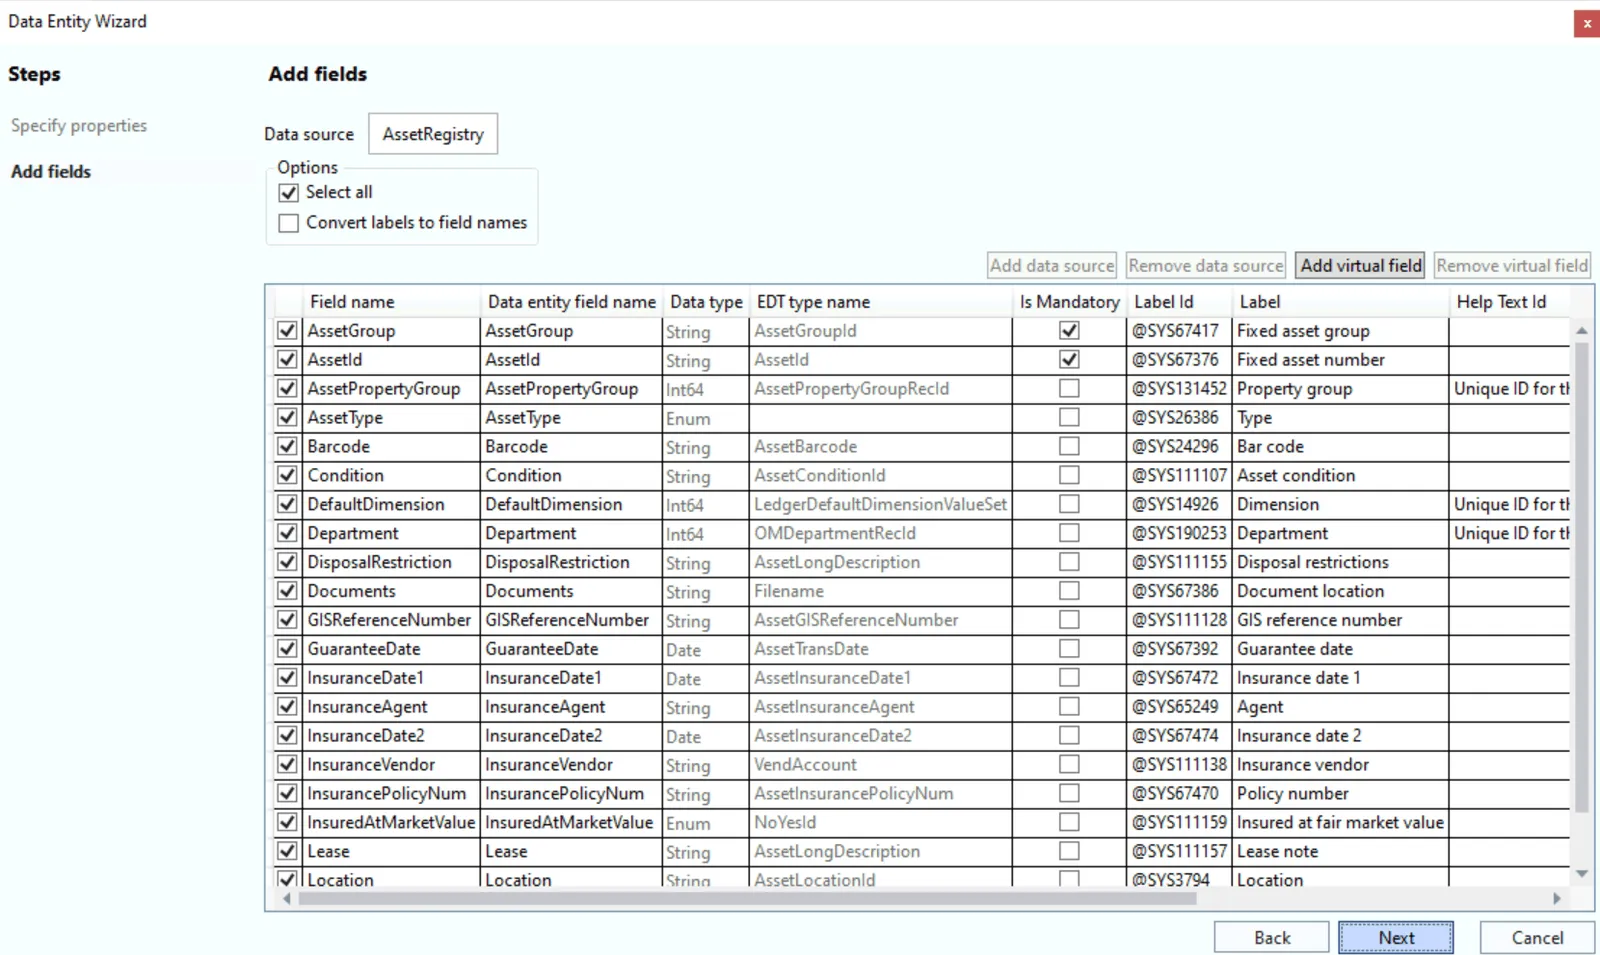
Select the fields. On the Add fields page the wizard lists the fields of the primary table. Typically you select all of them first and later remove the ones you do not need. You can also add fields from related tables if needed.
-
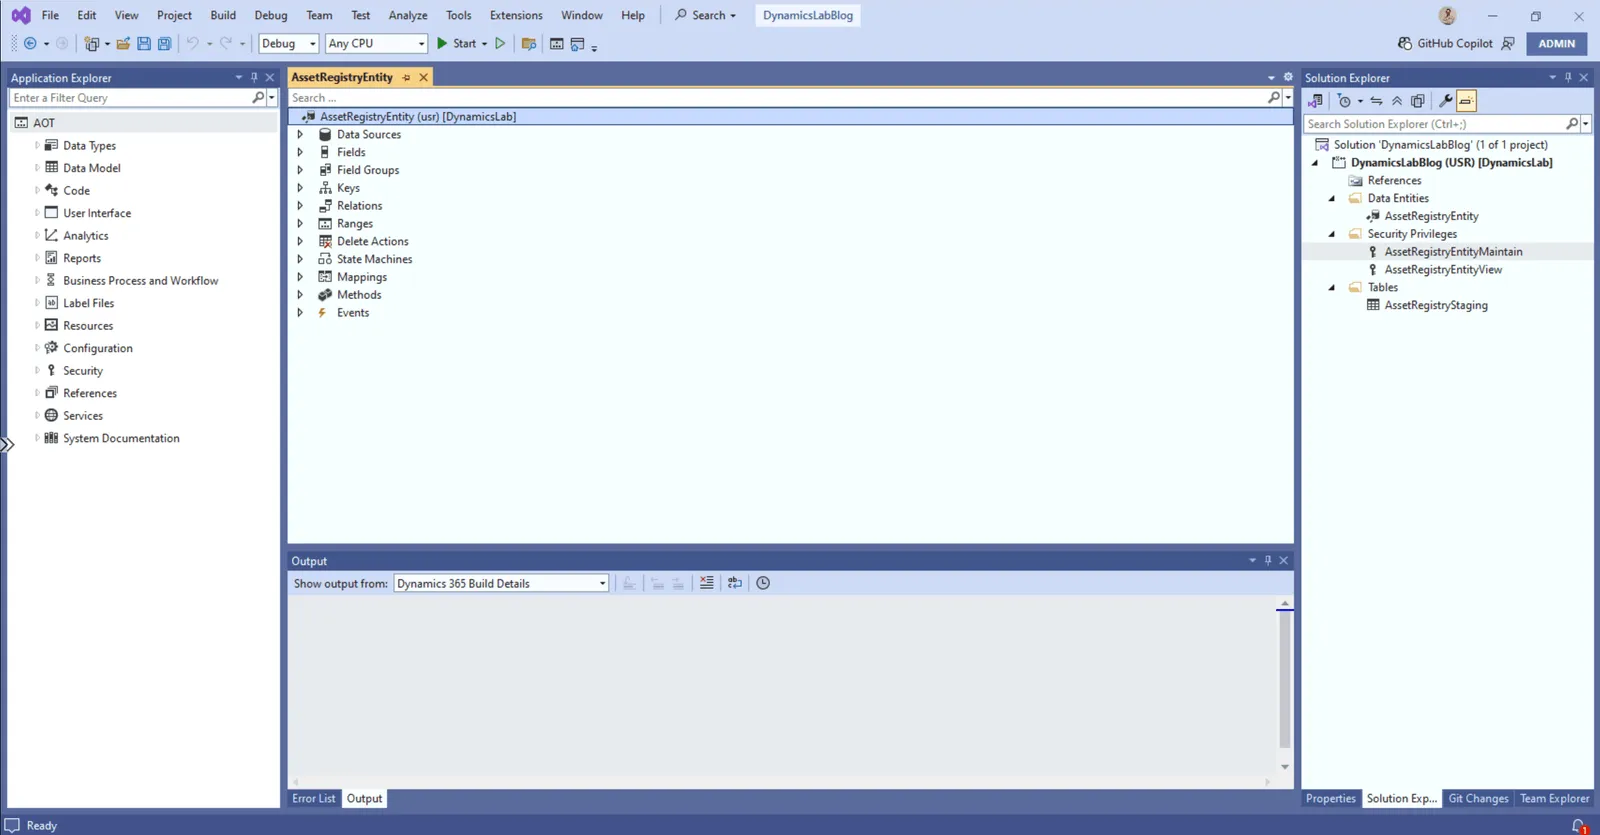
Finish the wizard and review. Review the generated entity in Visual Studio and check that the fields, data sources and keys are correct. Adjust labels or add computed fields if needed.
-
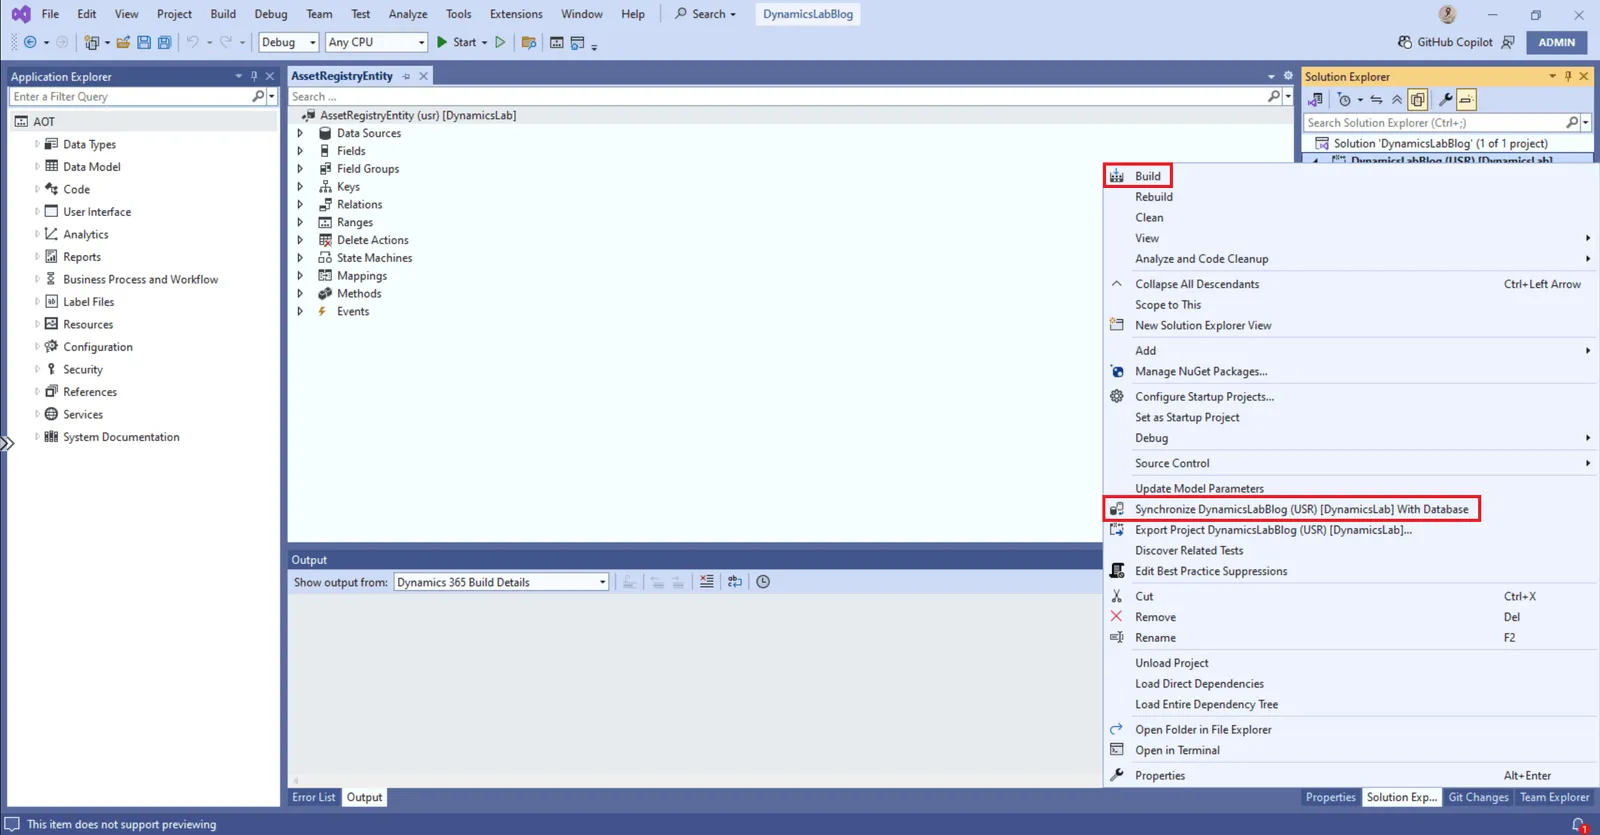
Build and synchronize. Build the project to compile the new entity and its staging table. Then synchronize the database, which creates the staging table in SQL. Fix any build or synchronization errors before you go on.
-
Refresh the entity list in F&O. In the Data management workspace, select Framework parameters > Entity settings > Refresh entity list again. The new entity should now appear in the Data entities list with
AssetRegistryEntityin the Target entity column. If it does not, check that the build and the synchronization succeeded and that you are in the right environment. -
Test your entity. Create an export project for the new entity and check that all the fields you need are in the exported file. Then import a small file to test the import as well.
Naming conventions
- Use meaningful names. The name should say what the entity is for and end with
Entity, for exampleAssetRegistryEntity. - Field names and labels. Align field names with their labels in the UI. Give foreign keys a name that ends in
IdorNumberand avoid abbreviations and underscores in names. - Unique labels. Give every data entity a label that no other entity uses, including entities from ISV solutions. Microsoft warns that with a shared label an entity can be missing after Refresh entity list and that this cannot be repaired in production. You have to fix the label and deploy again.
- Use a prefix for custom objects. Give every custom entity, table and class the same short prefix, usually three letters. A field that you add to a standard table through an extension gets it too, for example
DYLLoyaltyLevel. The prefix shows at once what is yours and lowers the risk of a name clash with another model, as Microsoft’s naming guidelines for extensions explain. The examples in this post are written without a prefix. With the prefixDYLthe entity would beDYLAssetRegistryEntity.
Best practices
Performance tuning
- Optimize for bulk operations. Run large imports in batch mode, otherwise a single thread runs the job. To split a file over several tasks, open Framework parameters > Entity settings > Configure entity execution parameters and set Import threshold record count and Import task count for the entity. Some entities accept only one task. Customers V3 is one of them, because it has a custom import sequence. Set-based processing is also switched on per entity, in the Set-based processing column of the Data entities list. Not every entity supports it and it skips some business logic, so test it before you rely on it.
- Minimize complexity. Keep the entity design simple and avoid extensive computed columns. Limit the data sources in an entity, ideally to three joins or fewer. Select only the fields you need.
- Database optimization. Make sure the underlying tables have indexes on the fields that are often used in filters or joins, so that queries run faster.
- Incremental exports. Without change tracking every export is a full export. To turn it on, select the entity in the Data entities list and choose an option under Change tracking. Enable primary table reacts only to changes in the main table of the entity. Enable entire entity reacts to a change in any table of the entity that can be tracked. Enable custom query uses a query that a developer returns from the
defaultCTQuerymethod of the entity. In the export project, also choose the incremental option under Default refresh type when you add the entity. Track only the tables the receiving system cares about. Microsoft says never to trackDimensionAttributeValueCombination,DimensionAttributeValueSetorInventDim, because that makes exports slow.
Maintainability and extensibility
- Centralize reusable logic. Put validation rules and transformations that several entities share into common classes instead of copying the code into every entity.
- Label and enum consistency. Use labels, enumerations and configuration keys instead of hard-coded values, so that a change carries over to every entity.
Security
Part 1 explains how security works on data entities. For a custom entity the two privileges from the wizard still have to go into duties:
- Data management. For import and export, extend the Data management duties of the entity category with them, here
DataManagementApplicationMasterEntitiesViewandDataManagementApplicationMasterEntitiesMaintain. - Excel and OData. For the Excel add-in, add them to the duty that already gives access to the page where the data is maintained. For an OData integration, create a separate duty.
- Integration mode. Check the Integration Mode of the entity permission in both privileges. With All a user who holds a Data management duty can also reach the entity through OData. If that is not wanted, create separate import and export privileges with the integration mode Data Management.
- Test with a real role. Test the setup with a realistic user role and not with an administrator, so that you see whether the permissions behave as intended.
Final thoughts
Most data entity work follows the same order. Check first whether a standard entity already covers the data. Extend it when only a field is missing and build a custom entity when no standard one fits.
The next parts of this series move on to Dataverse. Part 3 compares Dual-write and virtual entities, two ways of making F&O data available there.
Have you extended or built a data entity of your own? Let me know on LinkedIn or through the contact page.
Links
- https://learn.microsoft.com/en-us/dynamics365/fin-ops-core/dev-itpro/data-entities/data-entities
- https://learn.microsoft.com/en-us/dynamics365/fin-ops-core/dev-itpro/data-entities/data-entities-data-packages
- https://learn.microsoft.com/en-us/dynamics365/fin-ops-core/fin-ops/data-entities/data-import-export-job
- https://learn.microsoft.com/en-us/dynamics365/fin-ops-core/dev-itpro/data-entities/data-export-perform
- https://learn.microsoft.com/en-us/dynamics365/fin-ops-core/dev-itpro/sysadmin/optimize-data-migration
- https://learn.microsoft.com/en-us/dynamics365/guidance/resources/import-customers
- https://learn.microsoft.com/en-us/dynamics365/fin-ops-core/dev-itpro/data-entities/entity-change-track
- https://learn.microsoft.com/en-us/dynamics365/fin-ops-core/dev-itpro/data-entities/build-consuming-data-entities
- https://learn.microsoft.com/en-us/dynamics365/fin-ops-core/dev-itpro/dev-tools/design-best-practices
- https://learn.microsoft.com/en-us/dynamics365/fin-ops-core/dev-itpro/extensibility/naming-guidelines-extensions
- https://learn.microsoft.com/en-us/dynamics365/fin-ops-core/dev-itpro/extensibility/method-wrapping-coc
- https://learn.microsoft.com/en-us/dynamics365/fin-ops-core/dev-itpro/data-entities/security-data-entities
- https://learn.microsoft.com/en-us/dynamics365/fin-ops-core/dev-itpro/data-entities/integration-overview
- https://learn.microsoft.com/en-us/dynamics365/fin-ops-core/dev-itpro/data-entities/services-home-page
- https://learn.microsoft.com/en-us/power-platform/developer/unified-experience/finance-operations-debug